

Images
Add, edit, and generate images.
Pictures come from the user's computer, from stock photo services, or from an AI model. On the canvas, the user crops a picture, fits it to the canvas, adds filters, and removes its background. A picture stays on screen for a set time, like a clip.
Setup
Upload, crop, fit modes, and filters work with no setup. The other options need a key, a server, or an AI provider, which you pass as props:
import { VideoEditor } from '@layermetry/media-editor/react';

export default function App() {
  return (
    <div style={{ position: 'fixed', inset: 0 }}>
      <VideoEditor
        licenseKey="YOUR_LICENSE_KEY"
        onClose={() => console.log('The editor was closed')}
        onExport={(file) => console.log(`Exported ${file.name}`)}
        // Background removal: your media server.
        mediaApiUrl="https://media.example.com"
        // Stock photos: your Pexels and Unsplash keys.
        stockMediaApis={{
          pexels: { apiKey: 'YOUR_PEXELS_KEY' },
          unsplash: { apiKey: 'YOUR_UNSPLASH_ACCESS_KEY', showAttribution: true },
        }}
        // Image generation and AI image editing: your AI proxy.
        ai={{ endpointUrl: 'https://api.example.com/ai' }}
      />
    </div>
  );
}| Option | Prop | Configuration page |
|---|---|---|
| Stock photos | stockMediaApis | Stock media |
| Background removal | mediaApiUrl | AI providers |
| Image generation, AI image editing | ai | AI providers |
Upload
Open Media, choose Photo, and press Upload Images. Press + on the file under Local Upload to add it to the canvas. The panel lists JPG, PNG, and GIF.
A selected picture shows Edit with AI, Make video, Crop, Effects, and ⋯ under it. ⋯ holds Animate, Fit mode, Fit to canvas, Remove BG, Opacity, and the layer order.
Stock photos
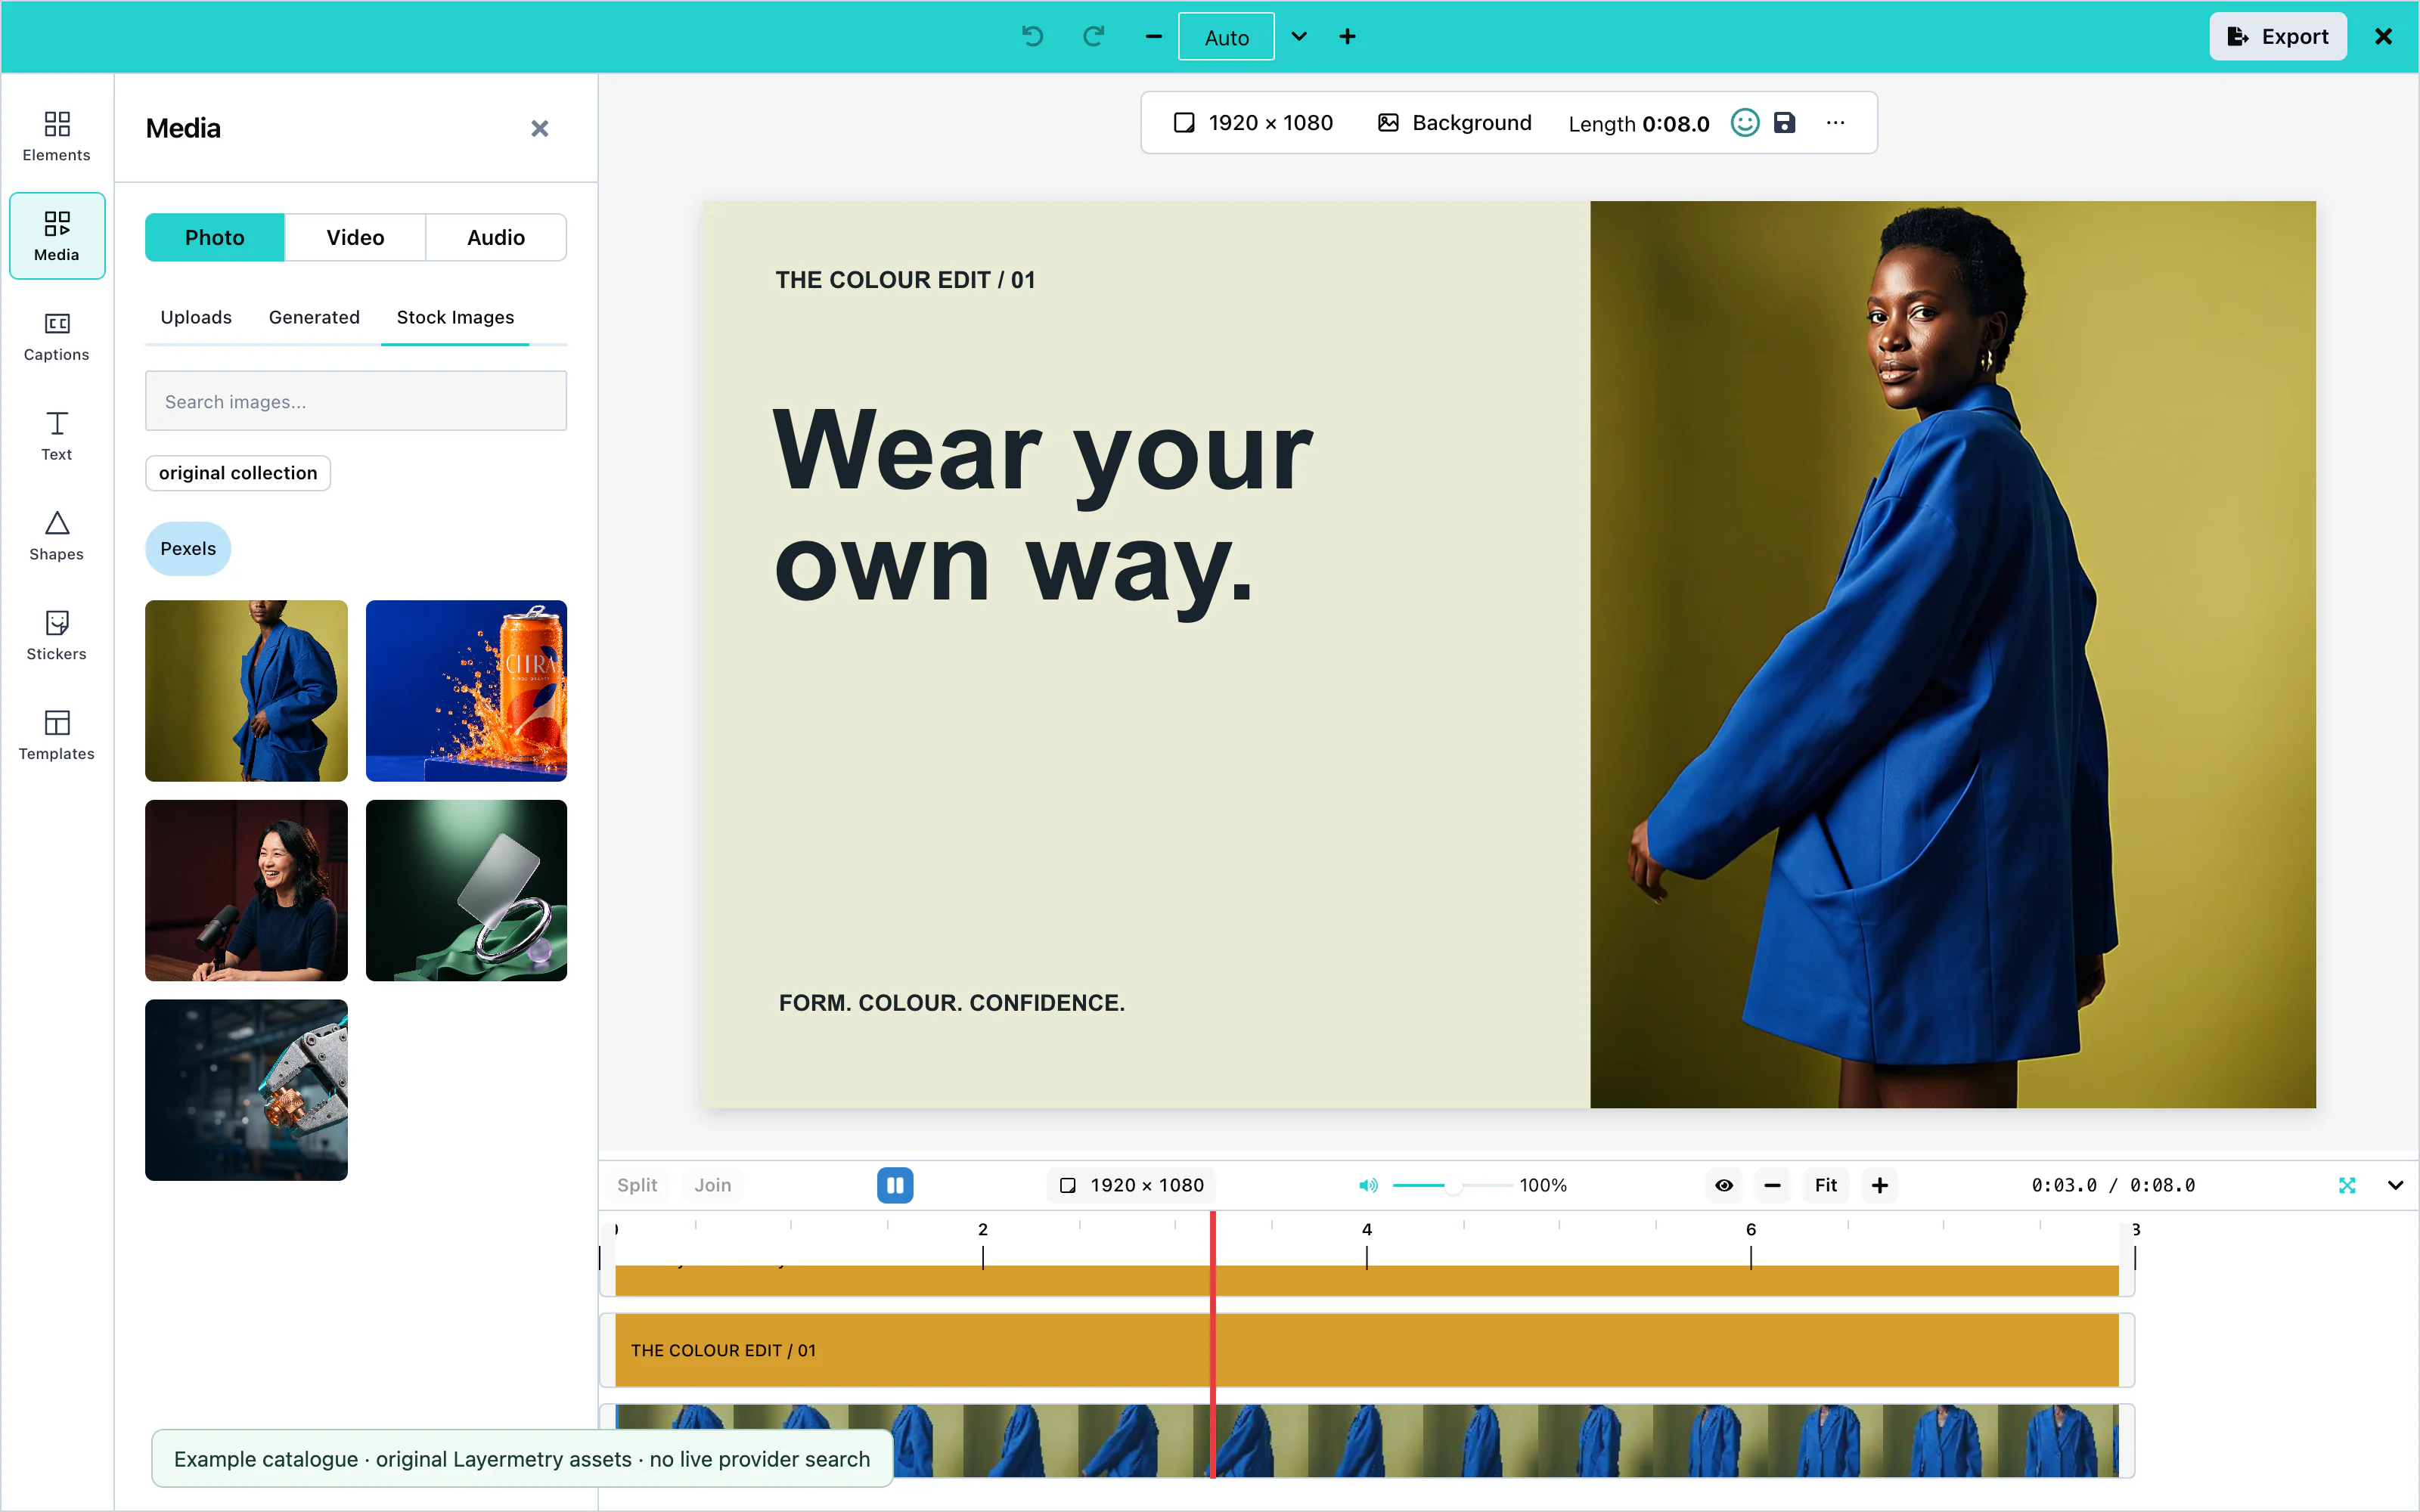
With stockMediaApis, the Photo tab of Media shows Stock Images, with one tab for each service. A click on a photo adds it to the canvas.
 View full size
The screenshot shows pictures returned by the example host's searchFn. It is not a live search of a stock provider.
Unsplash requires showAttribution: true, so the photographer's name is shown with each photo.
Crop
Select a picture and press Crop. Drag the edges of the frame to choose the part that shows. Click outside the picture to apply the crop, or press Esc to cancel. Clear crop shows the whole picture again.
Fit modes
Fit mode, under ⋯, decides how a picture fills the canvas:
| Mode | What it does |
|---|---|
| Fit | Shows the whole picture, as large as the canvas allows. Space can remain at two sides. |
| Fill | Covers the whole canvas, and cuts off what does not fit. |
| Stretch | Covers the whole canvas, and changes the proportions of the picture if needed. |
New pictures follow mediaAddPolicy: 'fit' (default) keeps the whole picture visible and centered, 'fill' covers the canvas, and 'none' keeps native pixels, centered. A sticker from the Stickers panel or an emoji keeps its own pixel size and is placed at the top-left corner of the canvas. A generated sticker is placed at x 100, y 100 with a size of 300 × 300. See Options.
Select a picture and choose ⋯ → Match canvas to use its file's dimensions, or its crop's dimensions when you cropped it. The crop that Fill makes does not count: after Fill, the canvas takes the file's dimensions. The picture fills that canvas in one undo step; other items keep their coordinates.
Fit to canvas applies the Fit mode in one click. Choosing Fit, Fill or Stretch applies it and closes the popup, with one undo step. Close makes no change. Fit keeps the proportions of a manual crop. After Fill, choosing Fit or Stretch removes the cover crop and restores the whole file, including pixels you cropped before choosing Fill. A crop you make after Fill is kept.
To move a picture to an edge, corner or the center without resizing it, choose ⋯ → Position. See Position for alignment and equal spacing.
Filters and adjustments
Select a picture and press Effects. Four filters switch on and off: Grayscale, Sepia, Invert, and Emboss. Adjustments take a number:
| Adjustment | Range |
|---|---|
| Blur | 0 to 10 |
| Brightness | 0 to 200 |
| Noise | 0 to 100 |
| Pixel Size | 1 to 10 |
| Contrast | 0 to 2 |
| Corner Radius | 0 to 100 |
| Shadow | 0 to 50 |
| Offset X, Offset Y | −50 to 50 |
| Shadow Offset X, Shadow Offset Y | −50 to 50 |
| Opacity | 0 to 100 |
Filters and adjustments appear in the exported video. See Effects and filters.
Background removal
mediaApiUrl. ai={{ hosted: true }} uses Layermetry’s service. Hosted AI is coming soon. Available only with an enterprise licence from Layermetry. See AI providers.Select a picture and choose Remove background in the right-click menu, or Remove BG under ⋯. The editor replaces the picture with the one your server returns, and says "Background removed from image successfully".
Image generation
ai. See AI providers.Open Media, choose Photo, and press Generate image. The user describes the picture and presses Generate. Add to canvas adds the selected result to the canvas. Every picture made in the session stays under Generated.
The right-click menu of the empty canvas also has Generate image here…, which places the picture where the user clicked.
The request has "operation": "image", and your server answers with { items: [{ url }] }. See Custom AI endpoint.
AI image editing
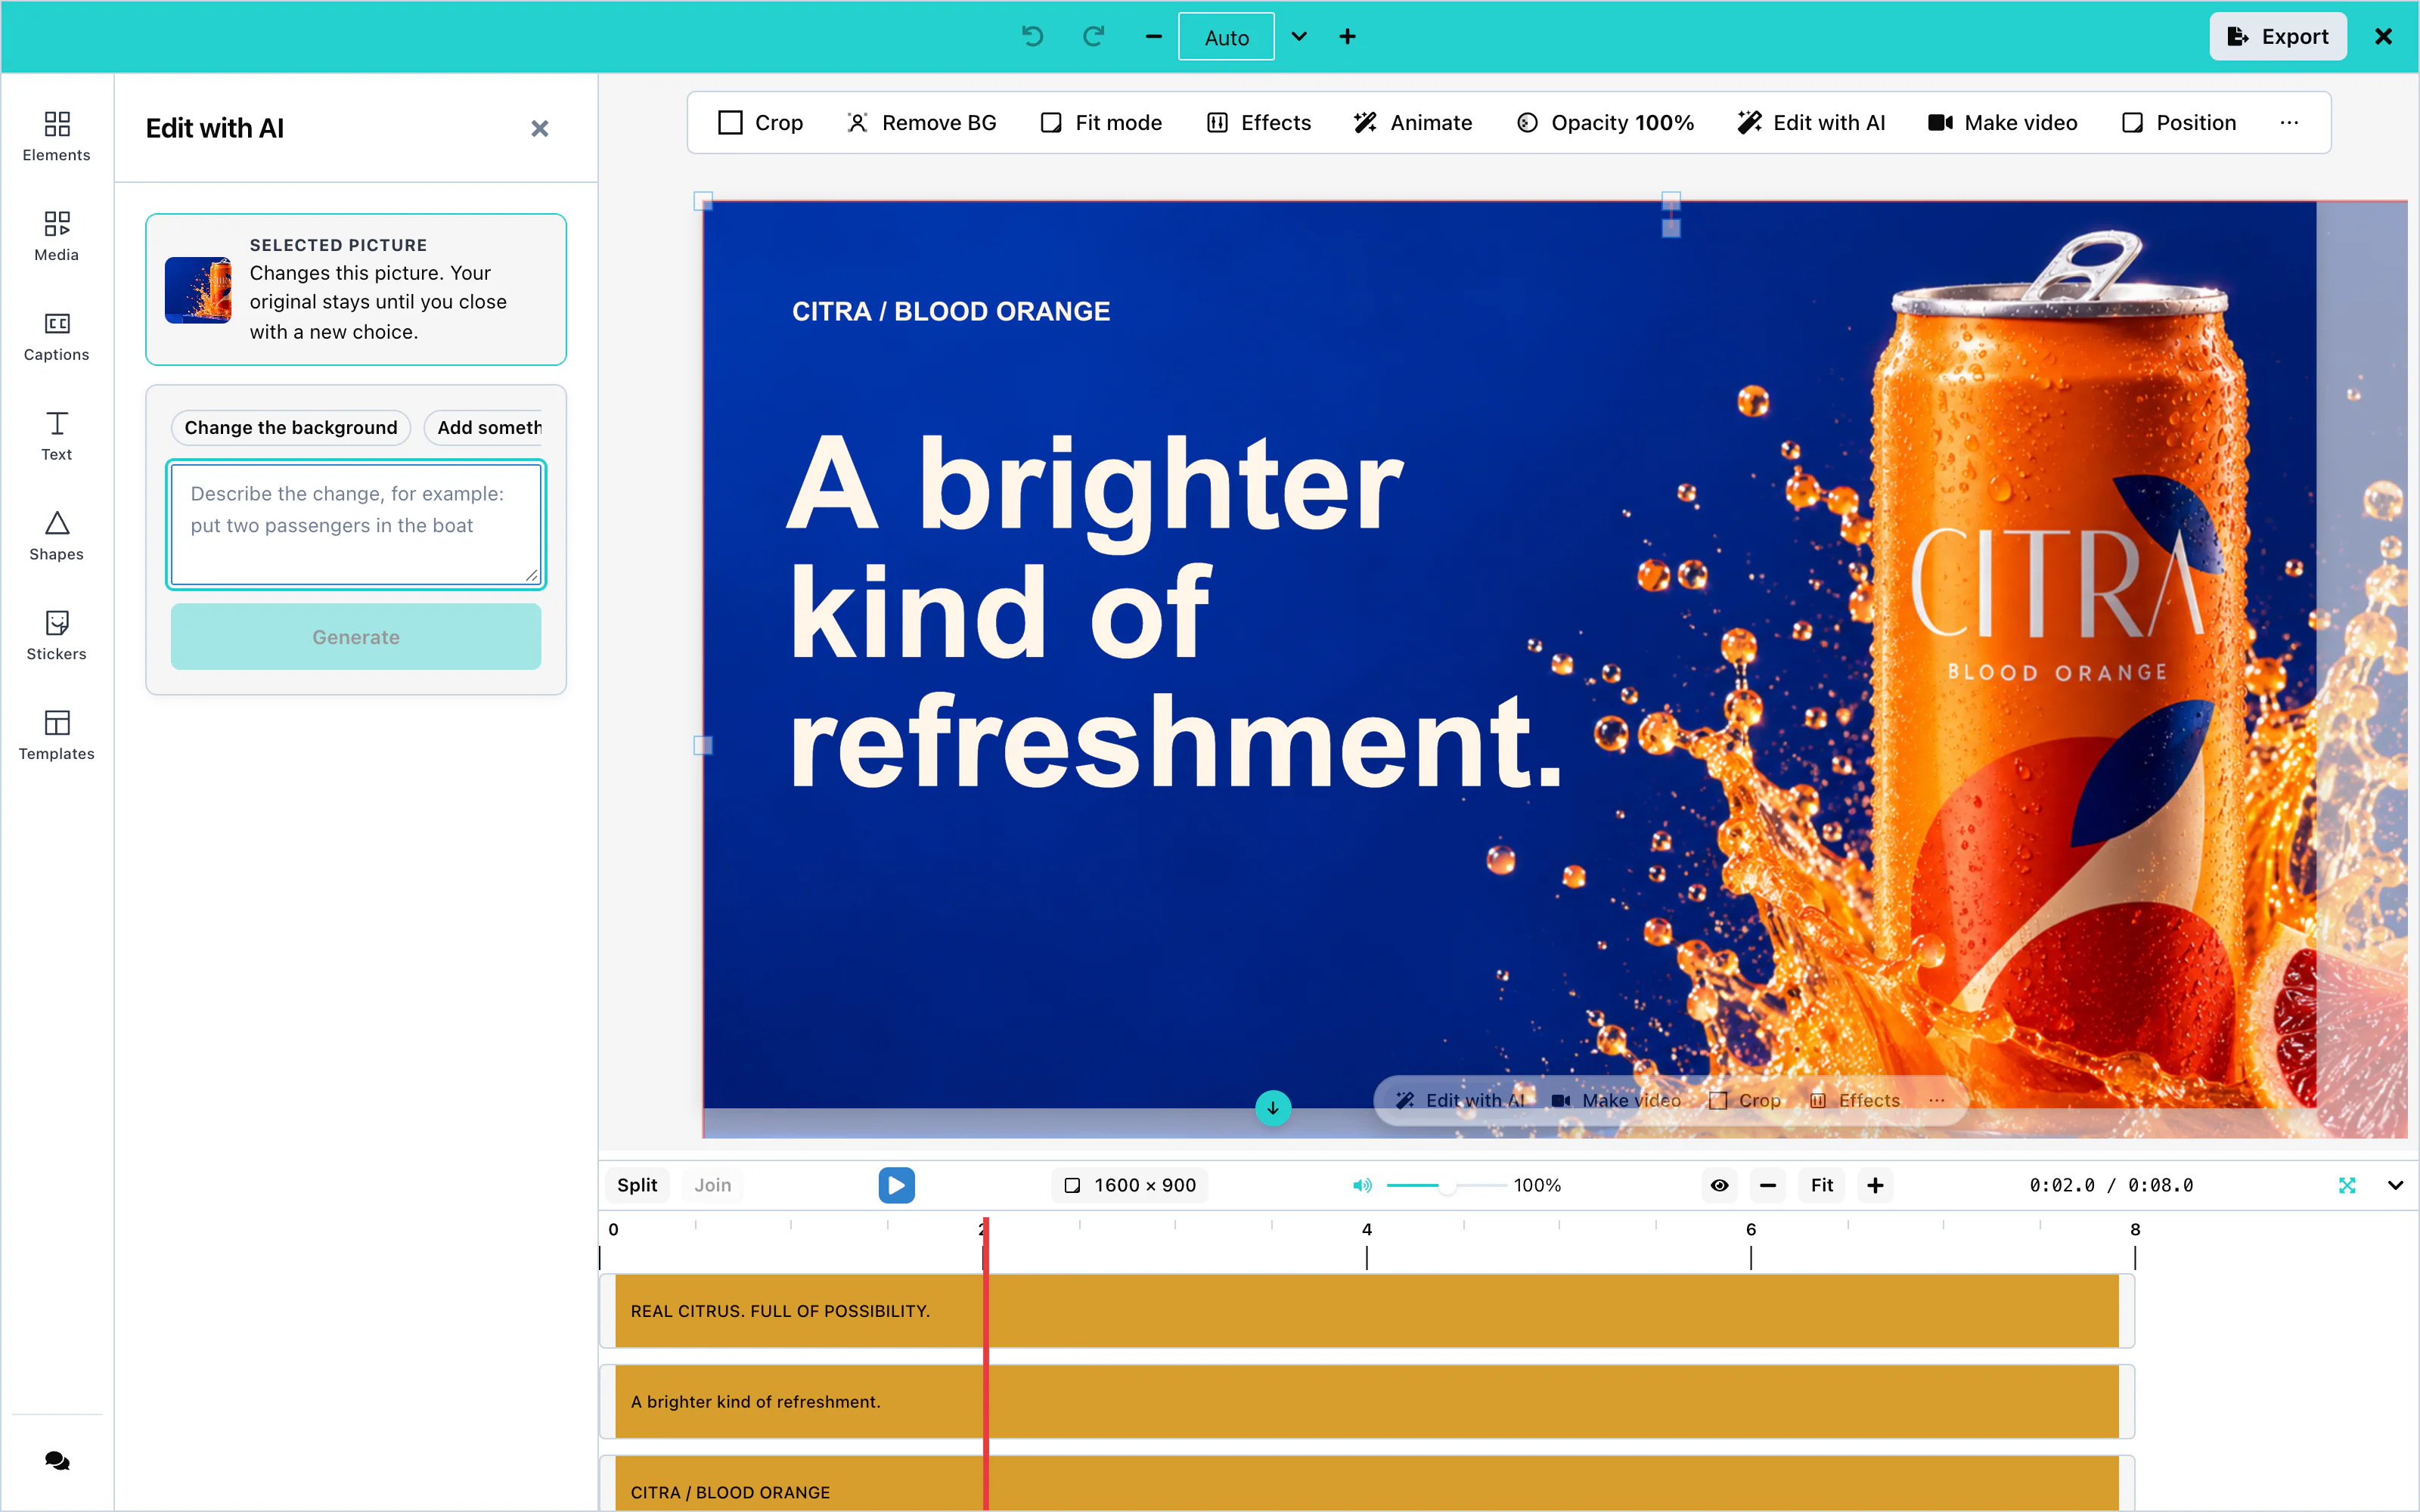
ai. See AI providers.Select a picture and press Edit with AI, or choose Edit with AI… in its right-click menu. The user describes the change, or starts from Change the background, Add something, Remove something, Change the time of day, or Change the style…, and presses Generate. The first suggestion previews on the selected picture. Click a card to compare results; choose Original to restore the source. Closing the box keeps the selected result as one editing action, with one Undo step.
 View full size
The request has "operation": "imageEdit" and carries the picture in input.source. With onUploadAsset, the editor stores the new picture in your storage before it replaces the old one. See Asset storage.
Upscaling
Coming soonUpscaling will increase the resolution of a picture.
Masks
Coming soonMasks will hide part of a picture behind a shape.
Configuration
| Prop | Type | Default | Description |
|---|---|---|---|
stockMediaApis | object | none | Pexels and Unsplash settings. Without it, there is no Stock Images tab. |
mediaApiUrl | string | none | The media server that removes backgrounds. ai={{ hosted: true }} uses the Layermetry address. Hosted AI is coming soon. Available only with an enterprise licence from Layermetry. |
ai | object | none | The AI provider. image: false hides Generate image, and imageEdit: false hides Edit with AI. |
onUploadAsset | function | none | Stores uploaded and AI-made pictures in your own storage. |
Events
Pictures have no events of their own. The editor calls onUploadAsset when the user keeps a picture made by AI, and the finished video reaches you through onExport. See Events.