

Timeline
Arrange clips, text, and audio in time.
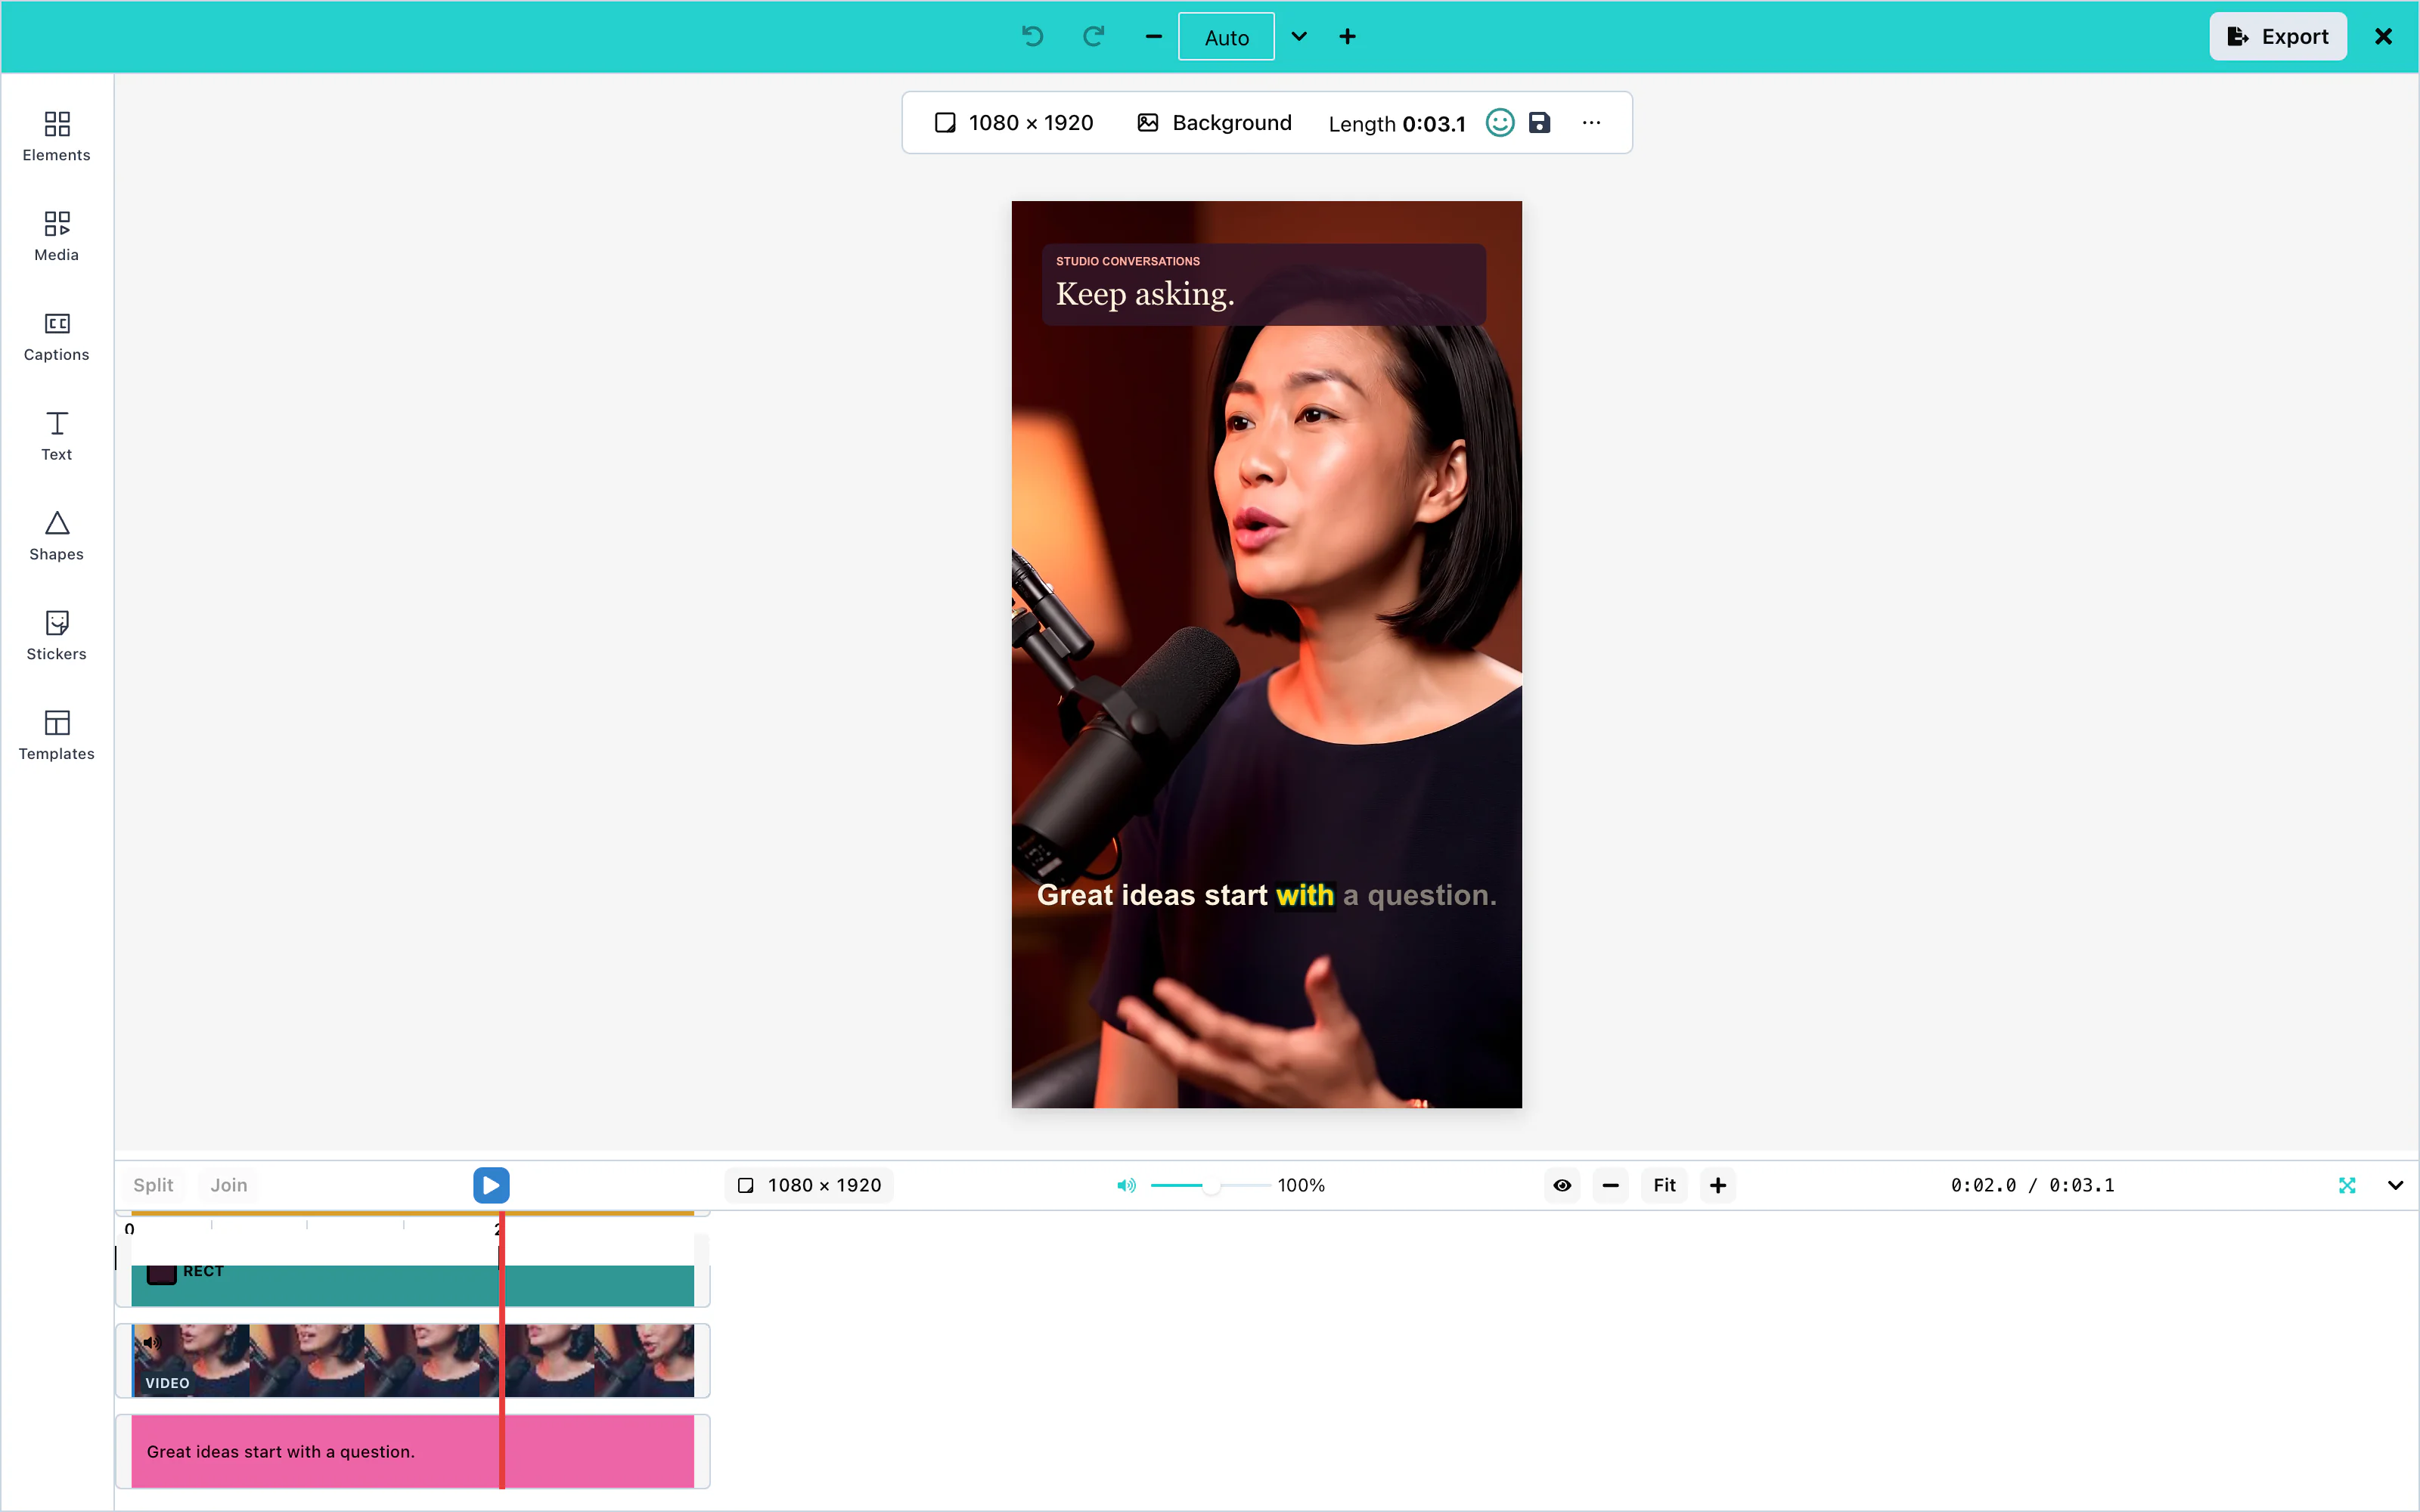
The timeline shows when each item appears in the video. It sits under the canvas, with one row for each clip, picture, text, or sound.
 View full size
The video is as long as its last item. With one 6-second clip, the time display shows 0:00.0 / 0:06.0.
Placement
Every item has a start time and an end time. The editor places a new item at the start of the video.
- Move. Drag an item left or right to change when it starts. Its length stays the same.
- Trim. Every item has a handle on its left edge and on its right edge. The right edge changes when the item ends. The left edge changes when the item starts, and its end stays where it is. On a video or sound clip, the left edge also cuts footage from the start of the clip. A clip cannot start before the first second of its file, and no item can be shorter than 0.1 seconds.
- Split. Select a clip, move the playhead, and press Split. The clip becomes two clips at the playhead. Join joins them again. Two pieces at different speeds cannot be joined.
A clip at a speed other than 1× shows its speed on its block, for example 2×. See Clip speed.
Right-click menu
A right-click on a clip opens the same menu as a right-click on that item on the canvas. The lines, the actions, the locks and the roles are the same, and so are your settings in ui.generative.contextMenu. The lines depend on the type of the clip, as on the canvas. See UI customization for the ids.
If the clip is not selected, the right-click selects it first. If it is already part of a selection, the selection stays as it is. A right-click on empty space in the timeline, on the ruler or on the playhead opens the browser's own menu. A long press on a phone also leaves the menu to the browser. Set ui.generative.contextMenu to false to give the browser's menu back for clips too.
The menu has one extra line, Split at playhead. The editor offers it only when it would cut the clip you clicked: exactly one clip is selected, it is the clip you right-clicked, and the playhead is inside that clip. At the very start or the very end of the clip, or outside it, the line is not shown. This is the same rule as the Split button. You can hide or rename the line with the id split.
A press with the right mouse button does not start a drag or a trim. On a Mac, Ctrl + click is a right-click, so it does not start a drag either. On Windows and Linux, Ctrl + click still adds the clip to the selection.
Clip colors
Each type of clip has its own color on the timeline: video, sound, picture, shape, title, caption and sticker. A caption is not the color of a title, and a sticker is not the color of a picture. The colors differ in the light and the dark theme, and the words on a clip stay readable.
Your theme still decides. When you set the theme color video, audio, image, shape or text, the clips of that type use your color. Captions follow text, and stickers follow image. When you do not set them, the timeline uses its own built-in colors. These built-in colors are used only on the timeline. They do not change the Play button or the audio panel. See Theming.
Panels and menus cover the timeline playhead line. The line stays inside the timeline while you edit in a panel.
Full-screen player
The Full screen button is next to the time in the timeline. The F key does the same. It shows only the picture, with a small player bar at the bottom. The bar has play and pause, a position slider, the time, the volume and mute, and Exit full screen. The volume is the same as the volume next to the play button of the timeline.
The toolbar and editing keyboard shortcuts are off while the player is open. A reply already in progress from the AI assistant can still change the design. Leave full screen with Escape before using Undo. The bar above the canvas, the floating pill and the selection frame are not shown. Delete, Undo and the other editing keys do nothing, and a click on the picture plays or pauses the video instead of selecting an item. Space plays and pauses. F or Escape leaves, and so does the Exit full screen button. Holding the F key does not switch the player on and off again.
The zoom is set to fit while the player is open, and it is put back when you leave. The selection is kept.
To hide the button and turn off the F key, set ui.features['player.fullscreen'] to false:
<VideoEditor
  licenseKey="YOUR_LICENSE_KEY"
  onClose={() => console.log('The editor was closed')}
  ui={{ features: { 'player.fullscreen': false } }}
/>
The editor shows the button only when the browser allows full screen for the page. Safari on an iPhone cannot show one element on the whole screen, so the iPhone shows no button. Safari before version 16.4 works through its older function names. If your editor is inside an iframe, add allow="fullscreen" to the iframe. If the browser refuses, nothing changes, and the console shows one warning that starts with [PlayerFullscreen].
Timeline on a phone
On a phone, the play button and the time come first in the row of controls. The whole row stays on one line, 32 px high. A swipe moves the row sideways, so that every control can be reached: Split, Join, the volume and the zoom buttons. The button that minimizes the timeline stays outside the moving part, so it is always visible.
Clip pictures
A video clip shows pictures from its own file in the timeline, so the user can see what is in each part of the clip. The editor makes the pictures in the browser, when the browser can decode the file. It makes them only for the part of the timeline that is visible, and for the cells that are about to scroll into view.
While the video plays, the editor keeps making pictures a little ahead of the playhead. It works more slowly then, so the preview stays smooth. If the playhead passes a cell before its picture is ready, the cell uses the frame that the preview already shows.
When pictures are slow, the clip says "Loading pictures…" or "Pictures are catching up…", and it offers a Show pictures button. A clip whose pictures failed offers Try again.
The pictures are not saved in the design, and they do not change the exported video. A clip that the user uploaded in the editor is read from the file that the editor already holds. A clip with an http or https address is downloaded once, in full, to make its pictures. A storage key that only your resolveAssetUrl function can turn into an address is not read.
The pictures are on by default. To keep plain colored clip bars and do no decoding at all, turn the pictures off with the timeline.filmstrip feature. The same ui setting works with mountVideoEditor and with the props object of the custom element. A change made while the editor is open takes effect at once. The image editor accepts this setting and ignores it.
<VideoEditor
  licenseKey="YOUR_LICENSE_KEY"
  ui={{ features: { 'timeline.filmstrip': false } }}
/>
Layers
The order of the rows is the order of the layers. The item in the top row is drawn over everything else, and the item in the bottom row is furthest back.
To change the order, drag a row up or down, or use Bring forward, Send backward, Bring to front, and Send to back in the right-click menu. The background is always behind everything, and it has no row.
Show only clips at the playhead (the eye button) hides the rows of items that are not visible at the current time. If no item is visible there, the timeline shows all rows.
Playback
Press Play, or the Space bar, to play the video from the playhead. The time display shows the position of the playhead and the length of the video.
Click the ruler above the rows to move the playhead. The zoom buttons make the timeline wider or narrower, and Zoom to fit shows the whole video. Minimize timeline makes the timeline small, to give the canvas more space.
Keyboard controls
These keys work while the editor has the focus:
| Key | Action |
|---|---|
| Space | Play or pause |
| Left arrow, Right arrow | Move the playhead by one frame (1/30 second) |
| Shift + Left arrow, Shift + Right arrow | Move the playhead by one second |
| Up arrow, Down arrow | Move the playhead to the previous or next edge of a clip |
| Home, End | Move the playhead to the start or the end |
| Shift + Z | Zoom to fit |
| Cmd + Z (Ctrl + Z) | Undo |
| Cmd + Shift + Z or Cmd + Y (Ctrl on Windows) | Redo |
| Cmd + C, Cmd + V, Cmd + D (Ctrl on Windows) | Copy, paste, and duplicate the selected item |
| Cmd + ] and Cmd + [ | Bring forward, send backward. Add Shift for front and back. |
| Delete, Backspace | Delete the selected item |
| F | Open the full-screen player. F or Escape leaves it. |
| M | Mute or unmute the preview |
| Cmd + Option + C, Cmd + Option + V (Ctrl + Alt on Windows) | Copy the style of the selected item, and paste it on the selected items. See Copy style and paste style. |
| Cmd + Shift + E (Ctrl + Shift + E) | Open the Export panel |
| Alt + Shift + A / Alt + Shift + D | Align the selection left / right |
| Alt + Shift + W / Alt + Shift + S | Align the selection top / bottom |
| Alt + Shift + H / Alt + Shift + V | Center the selection horizontally / vertically |
Use Alt (Option ⌥ on Mac) with Shift for the alignment shortcuts. They align a single item or a complete group to the canvas and several items or groups to each other. They work while the editor holds the keyboard and do nothing while you type in a field. Movement locks still apply. You can also use the Position control.
Mute, the M key and the volume slider next to the play button change the sound of the preview only. They do not change the exported video. To change the sound of a clip, see Audio.